You spend hundreds of dollars on high-quality makeup and hours perfecting your skincare routine. But if you are using dirty tools, you are essentially painting your face with bacteria, old oils, and dead skin cells.
Ignoring your brushes doesn’t just lead to muddy makeup application; it’s a leading cause of clogged pores and acne breakouts. Fortunately, learning how to clean makeup brushes is a simple habit that will extend the life of your tools and keep your complexion clear.
Learning how to clean your makeup brushes is essential for healthy skin and flawless application. To clean brushes effectively, you should know what to wash makeup brushes with, such as a gentle shampoo or specialized cleanser.
The best way to clean makeup brushes involves swirling the bristles in lukewarm water and soap without soaking the handle. If you want to know how to wash makeup brushes at home, simply use your palm or a silicone mat. Mastering how to wash makeup brush at home ensures your tools stay germ-free. Follow these steps for how to clean makeup brushes at home weekly.
Key Takeaways
- Frequency: Deep clean your foundation and concealer brushes once a week. Eye brushes can go every two weeks.
- The Right Soap: Use a dedicated brush cleanser or a gentle baby shampoo to avoid stripping the bristles.
- Temperature Matters: Always use lukewarm water. Boiling water can damage the glue (ferrule) that holds the bristles together.
- Drying Strategy: Never dry brushes standing up. Always lay them flat or at a downward angle.
Why You Must Clean Your Makeup Brushes Regularly
It is easy to push this chore to the bottom of your to-do list, but the consequences of dirty brushes are more than just aesthetic.
- Prevent Skin Breakouts: Brushes are a breeding ground for bacteria. Every time you swipe a dirty brush across your face, you risk transferring acne-causing germs.
- Better Makeup Application: Old product buildup makes bristles stiff. Clean brushes ensure a seamless, airbrushed finish and better color payoff.
- Protect Your Investment: High-end brushes can last a decade if maintained. Regular cleaning prevents the bristles from shedding and keeps them soft.
Read More: How to Lower LDL Cholesterol
What You Need to Get Started
Using a makeup brush cleaner machine is the ultimate time-saver for any beauty enthusiast. If you want deep-cleaned tools without the manual effort, an electric makeup brush cleaner uses rapid rotation to spin away stubborn residue and bacteria in seconds.
This high-tech makeup brush cleaner machine not only washes but also dries your brushes almost instantly, preventing mold growth. By switching to an electric makeup brush cleaner, you ensure your bristles stay soft and your skin stays clear. Investing in a makeup brush cleaner machine is the most efficient way to maintain a professional and hygienic makeup routine at home.
- A Cleaning Agent: A dedicated makeup brush cleaner, baby shampoo, or a gentle solid soap.
- A Cleaning Mat (Optional): A silicone textured mat helps agitate the bristles and deep clean the core of the brush.
- A Clean Towel: For drying and reshaping.
- Lukewarm Running Water: Hot water is a no-go.
How to Clean Makeup Brushes: Step-by-Step
Learning how to clean makeup brushes at home is a simple yet vital step for maintaining clear skin. To begin, gather your dirty tools and a high-quality solution to understand how to clean makeup brushes with brush cleaner effectively.
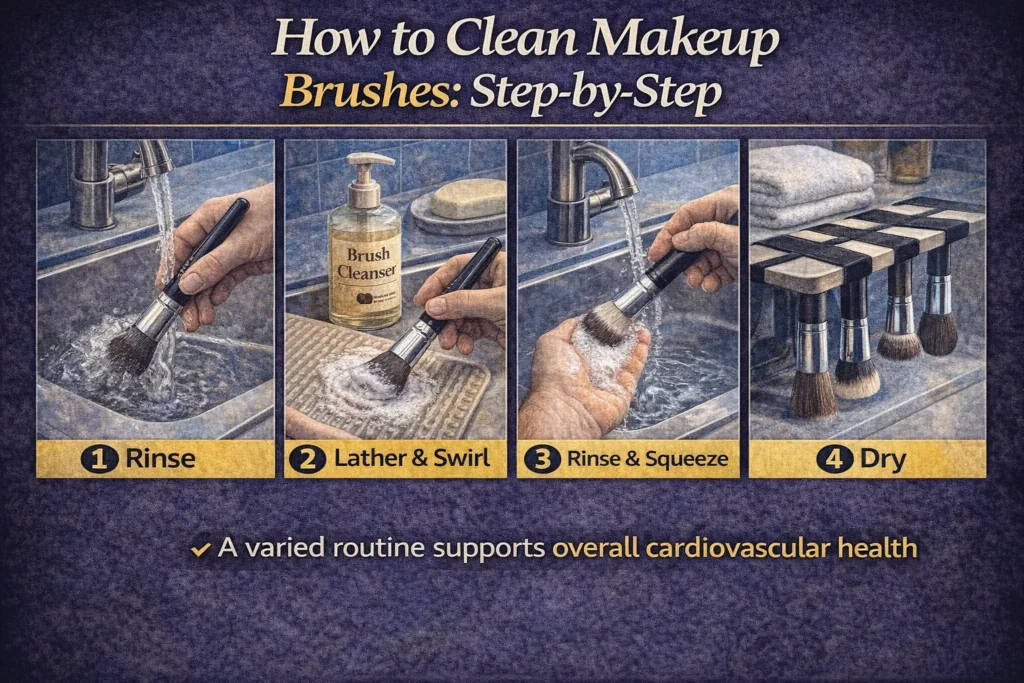
Simply dip the bristles into the liquid, swirl them gently to dissolve buildup, and rinse with lukewarm water. If you don’t have a professional product, you can still learn how to clean makeup brushes at home using gentle soap. Mastering how to clean makeup brushes with brush cleaner ensures that your application remains flawless and your brushes stay in top condition for years.
1. Wet the Bristles
Hold your brush with the bristles pointing down. Rinse them under lukewarm water. Avoid getting water into the “ferrule” (the metal part), as this can dissolve the glue and lead to shedding.
2. Apply Cleanser
Put a small drop of your chosen cleanser into the palm of your hand or onto a silicone cleaning mat.
3. Swirl and Lather
Gently swirl the brush in circular motions against your palm or the mat. You will see the makeup start to dissolve immediately. Continue until a rich, colored lather forms.
4. Rinse Thoroughly
Rinse the bristles under the tap again, always keeping the brush pointed downward. Repeat the lathering and rinsing steps until the water runs completely clear.
5. Squeeze and Reshape
Use your fingers to gently squeeze out excess water. While the bristles are damp, use your hand to reshape the brush head to its original form.
how to clean makeup sponges
Knowing how to clean makeup sponges is essential to prevent breakouts and ensure a smooth foundation application. To learn how to clean a makeup sponge effectively, wet it thoroughly and apply a dedicated makeup sponge cleaner or gentle soap.
If you are wondering how do you clean makeup sponges deeply, massage the soap into the core to release trapped product. Knowing how to wash makeup sponges regularly—ideally after every use—keeps them hygienic. Whether you need to know how to clean beauty blender tools or a standard sponge makeup, thorough rinsing and air-drying are key steps for any makeup sponge routine.
Choosing the Best Cleaning Agent
Using the best makeup brush cleaner is essential for maintaining hygiene and extending the life of your tools. A high-quality makeup brush cleaner effectively removes stubborn foundation and bacteria that build up over time.
Whether you prefer a liquid solution or a solid brush cleaner, choosing a dedicated makeup brushes cleaner ensures that bristles remain soft and skin-friendly. For those on the go, a quick-dry brush cleaner makeup spray is a game-changer. Investing in a reliable makeup cleaner brush formula prevents breakouts and keeps your application flawless. Regularly using a makeup brush cleaner is the secret to professional results.
| Cleaning Agent | Best For | Pros | Cons |
| Baby Shampoo | Natural hair brushes | Very gentle, affordable. | Might struggle with waterproof foundation. |
| Professional Brush Cleanser | All brush types | Specifically formulated, rinses fast. | More expensive than soap. |
| Solid Brush Soap | Travel & deep cleaning | Very effective for sponges and thick brushes. | Can be messy to store. |
| Dish Soap | Synthetic brushes only | Cuts through heavy oils and silicone. | Can be too harsh for natural fibers. |
The Critical Step: Drying Your Brushes Properly
If you take only one thing away from this guide, let it be this: Never dry your brushes standing up in a cup.
When brushes dry vertically, water seeps down into the handle and the ferrule. This rots the wood and loosens the glue, causing your brush to literally fall apart. Instead, follow these tips:
- Lay them flat: Place your brushes on a clean towel on a flat surface.
- The “Overhang” Method: Let the bristle ends hang off the edge of a counter. This allows air to circulate 360 degrees around the head for faster drying.
- Avoid Heat: Never use a hair dryer or place them on a radiator. Let them air dry overnight.
Creating a diy makeup brush cleaning solution is a simple and cost-effective way to keep your tools hygienic. To make a makeup brush cleaner diy, combine lukewarm water with a bit of gentle dish soap and a teaspoon of olive oil to break down stubborn pigments while conditioning the bristles.
This effective diy makeup brush cleaner removes bacteria and oil buildup without harsh chemicals. Simply swirl your brushes in the mixture and rinse thoroughly. By using this diy makeup brush cleaning solution regularly at home, you can extend the life of your brushes and ensure a flawless, breakout-free makeup application every time.
Conclusion
Knowing how to clean makeup brushes is an essential skill for anyone who wears makeup. It’s the easiest way to ensure your skin stays clear and your makeup looks professionally applied every single day.
Set aside 15 minutes every Sunday to give your tools some love. Your skin (and your wallet) will thank you.
Would you like me to recommend the top 3 silicone cleaning mats or the best budget-friendly baby shampoos for your kit?
Frequently Asked Questions (FAQ)
Q: How often should I clean my makeup sponges?
A: Unlike brushes, sponges are porous and hold onto moisture. You should ideally wash your beauty blender or makeup sponge after every single use to prevent mold growth.
Q: Can I use olive oil to clean my brushes?
A: Yes, but only as a pre-cleaner. Mixing a bit of olive oil with dish soap is great for breaking down stubborn, waterproof products. However, make sure you wash the oil out thoroughly with soap afterward so it doesn’t leave a greasy residue.
Q: When should I throw my makeup brushes away?
A: If your brush starts shedding excessively, feels scratchy on your skin, or the handle is wobbly even after cleaning, it is time for a replacement. A well-cared-for brush can last 5 to 10 years.
Q: Is a “daily” brush spray enough?
A: Daily disinfectant sprays are great for a quick color change or a surface clean, but they cannot replace a weekly deep clean. They don’t reach the center of the brush where bacteria hide.