Tying a tie is a useful skill that can instantly polish your appearance for any formal or professional setting. The simplest way to tie a tie is using the Four-in-Hand knot, which is quick, easy, and works well with most collar styles.
I’ve learned that mastering this basic knot builds confidence and ensures you never struggle when dressing up. In this article, I’ll guide you step-by-step through tying this classic knot so you can look sharp without stress.
Learning how to tie a tie is a fundamental grooming skill that instantly elevates your formal look. If you are looking for an easy tie knot, the Four-in-Hand is the perfect place to start. To tie a tie how to style correctly, begin by draping the fabric around your neck.
For those wondering how to tie a tie step by step, the process involves crossing the wide end over the narrow end, looping it underneath, and then pulling it through the neck loop. This method is often considered the best way how to tie a tie in 3 steps for beginners who need a quick, easy tie solution.
Popular Ways to Tie a Tie
- Four-in-Hand: Best for casual settings or narrow collars.
- Half-Windsor: A medium-sized, symmetrical knot tie.
- Full Windsor: The classic choice for wide-spread collars.
Understanding how to wear a tie step by step also means paying attention to the length; the tip should ideally rest right at your belt line. Whether you are tying a tie for a wedding or learning how to wear necktie step by step for a job interview, practice makes perfect. Once you master how to do a tie properly, you can experiment with different ways to tie a tie to suit your personal style. Knowing how to put on a tie with confidence ensures you always look sharp and professional.
Preparing to Tie a Tie
Before starting, I focus on picking the right tie, matching it to my shirt and collar style, and making sure the length is just right. These steps set a solid foundation for tying a neat, professional knot.
Choosing the Right Tie: Tips on How to Tie a Tie
I always consider the occasion when selecting a tie. For formal events, I pick solid colors or subtle patterns. For casual settings, bolder designs or textures work well. Material matters too; silk is classic, while wool or knit ties give a relaxed vibe.
Width is important. I match the tie’s width to my jacket’s lapel—narrow lapels call for slimmer ties, and wider lapels suit broader ties. This balance helps maintain a proportional look.
Color coordination is key. I avoid clashing with my shirt and jacket. Neutral or complementary colors create a cohesive outfit. For example, a navy tie pairs well with a light blue shirt.
Mastering the windsor knot tie is the ultimate way to project power and confidence at formal events. Often called the Full Windsor, this windsor necktie style is famous for its thick, wide, and perfectly symmetrical triangular shape.

If you are looking for a windsor knot tutorial, the process starts with the wide end of the tie hanging about 12 inches lower than the narrow end. To successfully how to tie a windsor knot, you must loop the wide end through the neck opening twice—once on each side—to create the necessary volume that defines this classic look.
Learning how to do a windsor knot requires a bit more patience than simpler knots, but the results are worth it. When tying a windsor tie, ensure your shirt has a spread collar to accommodate the larger size of the knot. Following a guide on how to tie a tie windsor knot ensures that the knot remains firm and centered.
Because of its formal appearance, the windsor tie knots are the preferred choice for weddings and high-stakes business meetings. Once you understand how to windsor knot your silk or heavy-fabric ties, you’ll never struggle with how to tie a tie windsor style again.
Selecting the Proper Shirt and Collar
I choose a shirt with a crisp collar that complements the tie knot style I plan to use. When learning how to tie a tie, point collars fit well with most knots, while spread collars accommodate wider knots like the Windsor.
The fabric also plays a role. Stiffer collars hold knots better and look sharper. Shirts with a bit of stretch allow easier adjustment when tying.
Buttoning the collar fully is essential. It frames the knot and prevents it from slipping. I make sure the collar is clean and wrinkle-free before proceeding.
Ensuring the Correct Tie Length
Length matters to achieve a polished appearance. I position the wide end so it extends about one to two inches past my belt buckle once tied. Too short or too long looks sloppy.
Starting with the narrow end free and the wide end longer adjusts the tie length effectively. I also consider my height and torso length; taller individuals might need longer ties.
If needed, I adjust the initial placement before tying. This step saves time and frustration and guarantees a proper fit when the knot is complete.
The double windsor, often referred to simply as the full windsor, is the gold standard for formal elegance. If you want to learn how to tie a double windsor knot, you are aiming for a thick, symmetrical shape that commands respect.
This double knot tie is particularly suited for spread collars and formal shirts. To begin tying double windsor styles, start with the wide end of the tie on your dominant side, extending significantly lower than the narrow end.
When you master how to tie a full windsor, you are actually performing a sequence of loops that build the “double” volume. Many beginners ask how tie a double windsor effectively; the secret lies in the extra wrap around the neck loop which creates that iconic triangular balance.
Following a guide on how to tie a windsor double knot ensures that the knot stays snug and professional all day. Whether you are searching for how to tie double windsor for a wedding or how to tie a double windsor tie for a corporate presentation, the double windsor knot is the most reliable choice. Once you understand how to tie double windsor knot techniques, you will always have a sharp, polished look ready for any occasion.
Step-By-Step Instructions for Popular Tie Knots
Each knot offers a distinct look and level of difficulty, depending on how much fabric is used and the final shape desired. When learning how to tie a tie, I focus on simple instructions for four common knots that suit different collar styles and occasions.
How to Tie a Four-in-Hand Knot
I start by placing the tie around my neck with the wide end on my right, about 12 inches longer than the narrow end. Then, I cross the wide end over the narrow end once, creating an X near the collar.
Next, I bring the wide end under the narrow end and back across the front. I pull the wide end up through the neck loop from underneath and then down through the loop I formed in the front.
Finally, I tighten the knot by sliding it upward and adjust for symmetry. This knot is slim and slightly asymmetrical, perfect for casual or everyday wear.
How to Tie a Half Windsor Knot
When practicing how to tie a tie, I place the tie around my neck with the wide end longer on the right. I cross the wide end over the narrow end, then bring it underneath and through the neck loop from below.
Next, I wrap the wide end behind the knot and bring it horizontally across the front from right to left. I then pull the wide end up through the neck loop one more time.
I finish by tucking it down through the loop at the front and tightening. The Half Windsor knot is medium-sized, more symmetrical than the Four-in-Hand, suitable for most dress shirt collars.
Adding a pocket handkerchief is the perfect finishing touch to any formal ensemble, but knowing how to fold a pocket square correctly is what truly defines your style. There are various pocket square styles, ranging from the crisp, professional “Presidential Fold” to the more flamboyant “Puff Fold.” If you are learning how to fold a pocket square for a suit, start with the flat fold: simply fold handkerchief layers into a neat rectangle that peeks just slightly above the pocket line.
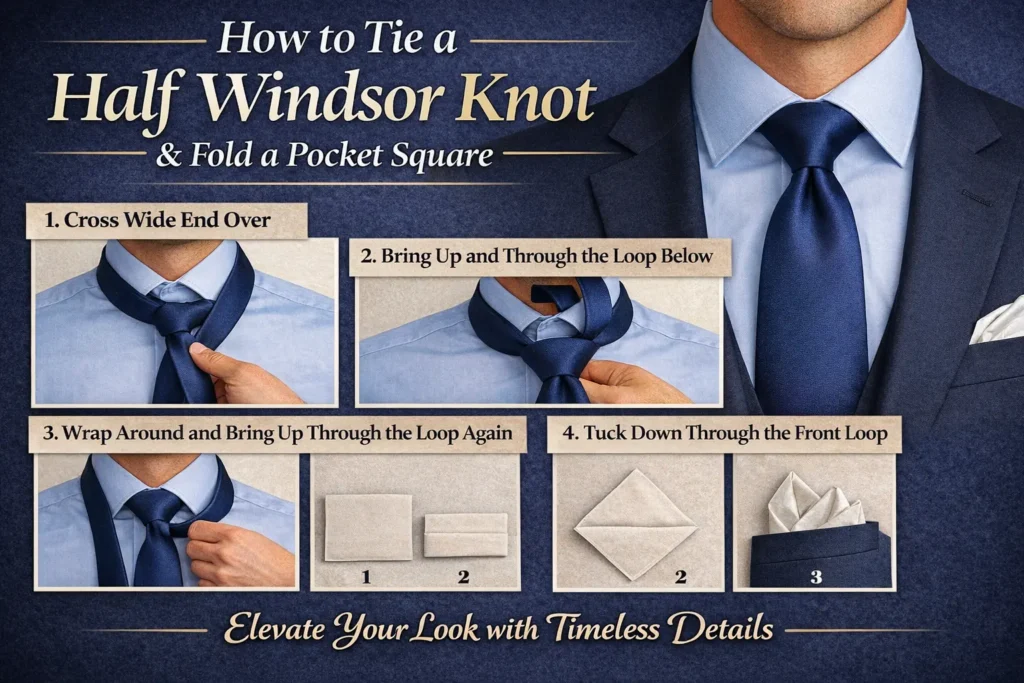
For those using a standard pocket handkerchief, the “Point Fold” is a classic choice. To achieve this, you must master folding pocket squares by creating a triangle and folding the corners inward to fit the width of your pocket. Knowing how to fold handkerchief for suit jackets ensures that the fabric doesn’t slip down or look bulky.
Whether you are curious about how to fold pocket square fabrics like silk or linen, the key is to match the fold to the occasion. Once you understand how to put a pocket square in place securely, you can experiment with different pocket square folds to express your personality. Learning how to fold a handkerchief properly is a simple way to elevate a basic blazer into a sharp, tailored look.
How to Tie a Full Windsor Knot
I begin with the wide end on my right, longer by about 14 inches. Crossing the wide end over the narrow end, I bring it up through the neck loop from underneath.
I then loop the wide end back down to the right, crossing behind the knot. Next, I bring it across the front from right to left and up through the neck loop again.
I finish by pulling the wide end down through the front loop I formed. The Full Windsor knot creates a large, triangular, and very symmetrical knot, great for wide collar spreads and formal settings.
How to Tie a Pratt Knot
I start with the tie inside-out, narrow end on my left, wide end on my right and longer. I cross the wide end under the narrow end, then bring it up through the neck loop from below.
Then, I pull the wide end down and across the front from right to left. I pass the wide end up again through the neck loop and finally down through the loop in front.
Tightening the knot creates a symmetrical, medium-sized knot with a neat appearance. The Pratt knot works well with most collar types and is easier to tie than the Full Windsor.
Learning how to tie a tie easy and efficiently is a skill that saves time during busy mornings. If you are in a rush, the best method is to master a technique that shows you how to tie a tie in 3 steps: simply loop, cross, and tuck. This easy tie knot, commonly known as the Four-in-Hand, is perfect for beginners because it requires minimal effort while still looking professional.
To begin, you must understand how to put on a tie so it sits comfortably around your collar. Start with the wide end longer than the narrow end, cross it over, bring it under, and pull it through the loop. Once you know how to do a tie with this simple method, you can achieve a polished look in seconds.
Instructions for Specialty Tie Knots
Specialty knots require more steps and precision than standard knots. They often create unique shapes and patterns that stand out. As you learn how to tie a tie, I will guide you through the essential movements to achieve these distinctive styles properly.
How to Tie an Eldredge Knot
The Eldredge knot uses the small end as the working end and creates a complex, braided appearance. Start with the tie around your neck, small end longer on your right. Cross the small end over the wide end to your left, then bring it behind and around the front to your right.
Next, wrap the small end up behind the knot and pass it down through the loop at the neck. Bring the small end around the front to the left, then up through the loop again on the right side. Finally, tuck the remaining small end behind the knot and adjust for symmetry. The result should look like a layered braid running down your tie.
How to Tie a Trinity Knot
The Trinity knot forms a triangular shape using multiple overlapping loops. Begin with the wide end on your right, small end on the left, and wide end longer. Cross the wide end over the small end and bring it behind to the neck loop.
Bring the wide end to the center front, loop it around the back, then bring it through the neck loop again. Fold the wide end around the front, tuck it underneath, and pass it through the loop created at the front. Adjust carefully to form a neat, three-part triangle with a balanced structure.
How to Tie a Bow Tie
When learning how to tie a tie, a bow tie requires precise folding rather than looping. Start by draping the bow tie around your neck, one end slightly longer than the other. Cross the longer end over the shorter one near the collar.
Fold the shorter end horizontally to form the front of the bow. Drop the longer end over the fold and pinch the bow shape together. Fold the longer end back on itself and pass it through the loop behind the bow. Tighten and adjust the bow evenly on both sides for a crisp, classic look.
Troubleshooting Common Tie Issues
When tying a tie, common problems often arise with the knot’s alignment, length, and fabric condition. Fixing these quickly ensures a clean, professional look.
Fixing a Crooked Knot
If my knot is crooked, I first loosen it completely. A tight knot hides mistakes, so starting with a relaxed knot helps me reposition the tie evenly.
I gently pull and adjust each side of the knot until it sits centered under my collar. Paying attention to the dimple just below the knot can improve alignment, as a well-formed dimple contributes to a balanced appearance.
Sometimes, retying the knot from scratch is the fastest solution. I make sure the wide end lays flat and the knot is symmetrical as I tighten it.
Avoiding Extra Long or Short Ties
When learning how to tie a tie, length is crucial for a polished look. Knowing how to tie a tie correctly ensures it ends just at the middle of your belt buckle. If it’s too long or short, the problem usually stems from improper positioning at the start.
I control length by adjusting where I place the wide end before beginning the knot. Starting with the wide end too low or high can throw off final length.
If the tie is consistently too long or short, I experiment by moving the wide end up or down by a few inches before knotting. Some ties are also cut longer or shorter, so choosing the right tie for my height and collar size saves time.
Dealing With Tie Wrinkles
Wrinkles detract from a clean tie. I avoid tight knots that crease the fabric. After tying, I smooth the tie with my fingers to reduce minor wrinkles.
If wrinkles persist, I use a low-heat steam from a handheld steamer or hang the tie in the bathroom during a hot shower. Direct ironing is risky; I only iron with a pressing cloth and the lowest setting if necessary.
Proper tie storage, such as hanging on a tie rack or rolling loosely, prevents wrinkles between wears.
Styling and Finishing Touches
The way you finalize your tie can change the entire look of your outfit. Small details make a big difference in presenting a polished and professional appearance.
Adding a Dimple to a Tie
When learning how to tie a tie, to add a dimple, I pinch the fabric just below the knot while tightening it. This creates a small crease that catches the light and adds dimension. The dimple should be centered and symmetrical to avoid looking sloppy.
I find it helps to shape the dimple by gently pressing it with my fingers after knotting. Avoid flattening the tie too much, as the dimple should stand out subtly. A well-formed dimple adds character without distracting from the overall neatness.
Coordinating With Accessories
I always check that my tie complements my shirt and jacket in color and pattern. When wearing patterned ties, I keep other accessories, like pocket squares or cufflinks, simple to avoid clashing.
Matching the metal of accessories (watch, cufflinks) to the buttons or belt buckle enhances coherence. I prefer to use the tie as the focal point and balance the rest of the look with understated accessories.
Tucking in the Tie Tail
After knotting, I tuck the narrow tail of the tie behind the wide front. Many ties have a loop on the back for this purpose; I thread the tail through to keep it in place.
If the tie lacks a loop, I position the tail carefully so it doesn’t peek out or snag. A properly secured tail maintains a clean front, preventing distractions and ensuring the tie stays aligned throughout the day.
Performing a car jack tire change safely requires following the correct steps to change a tire in order. Start by loosening tire lug nuts while the vehicle is still on the ground; this provides the resistance needed to loosen wheel nuts without the wheel spinning. Once the car is raised, you can complete the swap.
If you plan to change tire at home, keep in mind that knowing how to change tire on rim is more complex than a standard roadside swap. While you can easily switch a pre-mounted spare, learning how to replace tire on rim or how to change tires on rims requires specialized tools to break the bead and seat the new rubber. Always double-check that your nuts are tightened in a star pattern before driving.
Care and Maintenance of Ties
Knowing how to tie a tie properly is just the start—taking care of ties extends their life and keeps them looking sharp. Proper storage prevents wrinkles and damage, and cleaning and ironing methods matter because ties are often made from delicate fabrics that require special attention.
Storing Ties Properly
I store my ties by hanging them on a tie rack or a hanger with wide enough space to avoid creasing. Rolling ties loosely and placing them in a drawer can also work, but it’s important not to pack them tightly.
Avoid direct sunlight when storing ties, as this can cause colors to fade. Silk ties especially need a breathable environment to prevent fabric deterioration. A cool, dry place is ideal.
I keep my ties from getting crushed by removing knots immediately after use. Leaving a knot tied will make wrinkles harder to remove and can weaken the fabric over time.
Cleaning and Ironing Ties
I rarely wash ties in a machine. Instead, I spot clean stains immediately with a damp cloth and mild detergent. For deeper cleaning, I take them to a professional dry cleaner to avoid water damage.
When ironing, I use a low heat setting and place a cotton cloth between the iron and the tie to protect the fabric. I avoid direct contact to prevent shiny marks or burns.
If I don’t have an iron, I hang ties in a steamy bathroom. The steam helps relax wrinkles safely without risking fabric damage.